This is an experience report–not a final tutorial–on how I made the image Starry Night, posted earlier this week. The step that remains to be completed is to finalize the tools to process the night-sky images. For this image I used one photograph, which was sufficient for this purpose, but for something more professional, more refined, requires more serious processing: image stacking. There are several stacking tool options, which I touch on below, but I have not concluded which is appropriate for my needs at this time.
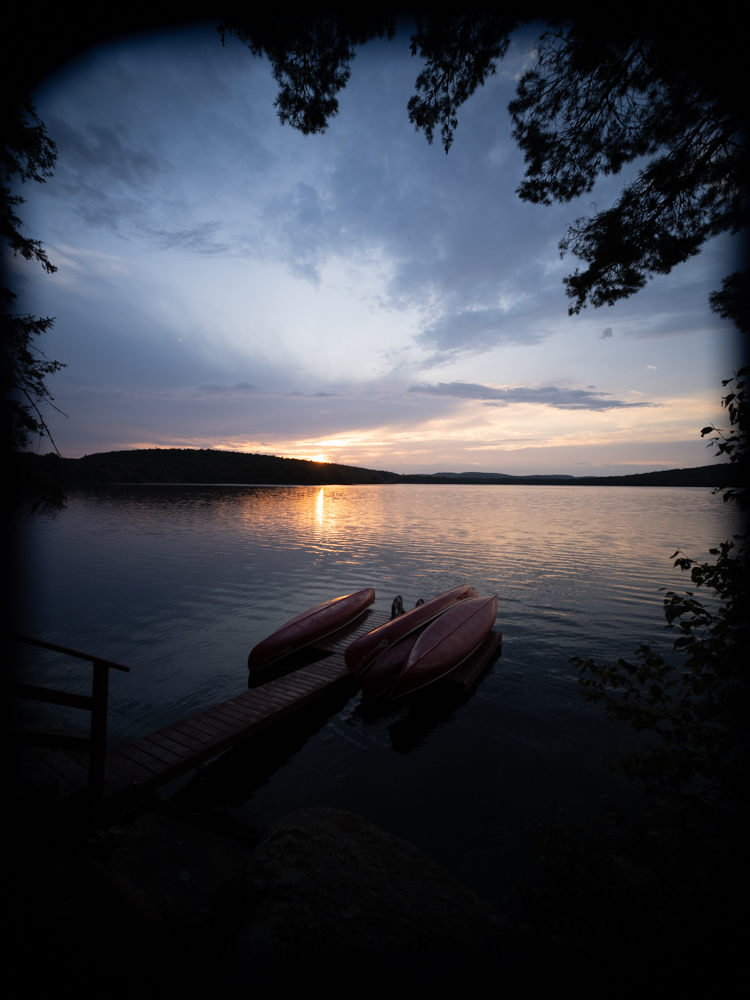
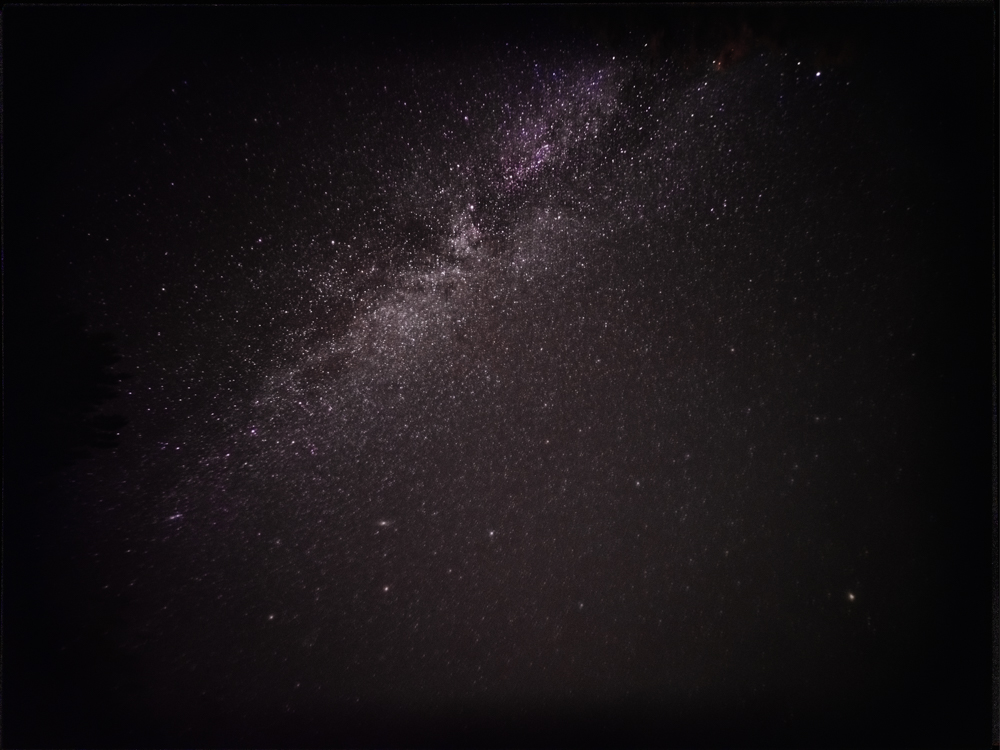
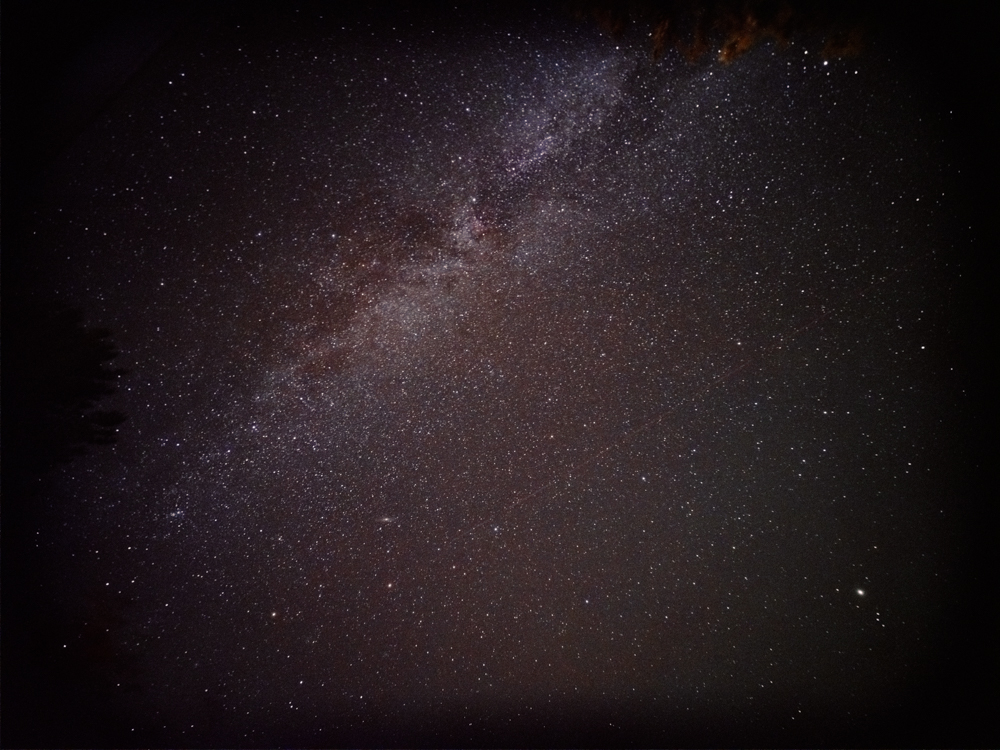
The Starry Night image is a composite of three photographs I took at the same location, Lake of Two Rivers, in Algonquin Park.

The foundational image is the landscape that includes the canoes, lake, distant hills and framing branches. The photograph was taken at dawn to capture the right amount light of the desired colour. The photograph of the Milky Way was taken the previous night, near the same location. The third element of the composition is of the comet, which was copied from another shot taken the same evening. The three photographs were “layered” in that order: landscape; stars; comet.

I followed four steps to make the final image:
- Take and post-process the picture of the landscape
- Take and post-process the picture of the stars
- Combine the two
- Post-process the combined image
The Landscape
There are various techniques for capturing the landscape component of a night sky image, such taking one shot exposed for the landscape, followed by several shots exposed for the night sky.
I decided to take a bracketed shot at dawn. I took 5 photographs, 2 at stops below and 2 at stops above proper exposure (i.e., -4, -2, 0, +2, +4). Shooting at dawn served three purposes. First, there is interesting light at this time of day. Second, it avoided a long exposure which would have flattened the waves in the lake. Finally, it let me take a shot that I could darken in post-processing, rather than lighten and introduce noise. Bracketing gave me a better chance at getting closer to the desired exposure, that is a shot that was dark enough to convince the viewer that it was night, yet with enough light so the details could be seen without excessive “noise”. I felt shooting at 2 stops apart gave me enough room to adjust up or down as necessary.
The Stars
Creating the final image was significantly more complicated, and made more difficult, because I’m not well-practiced in astrophotography. I had a lot of difficulty with the stacking applications, so in the end I found stacking and manually aligning unto 6 photographs with Photoshop was doable.
To avoid star trails, my plan was to take multiple shorter shots and use stacking software to align and merge individual photographs. I ended up taking 30 shots at 6.5 seconds each. With stacking software, this would be the equivalent of one shot at 195 seconds (see Estimating Maximum Shutter Speed below).
However, my inexperience lead me down an unexpected path.
I tried a total of three stacking application, but none provided results consistent with my expectations1. Two of the packages did not give me the results I expected, specifically when using more than 5 or 6 photographs; there were star trails, and noise remained. This is probably because the individual photographs did not get aligned properly, which could be the result of my lack of experience with the software. The third one repeatedly crashed before completing its processing.
Regardless of which package, the resulting image needed to be run through a “stretching” process in photoshop2. This is a non-trivial process requiring several processing iterations (see “Stretching” below).
With the unfavourable results with the stacking packages, I decided I would try using Photoshop to stack and then align the images. This process seemed to work fairly well with 6 images, and it offered a level of transparency the others did not (see “Stacking Astrophotography Images in Photoshop” below). However, there are limitations with the Photoshop approach, notably that manual alignment is usually required3, the inability to calibrate the frames, the lack of specialized algorithms to reduce transient objects and batch processing capable of handling a large number of images.
But again, I was left having to “Stretch” the resulting image.
Given the amount of overhead to stack the photographs, I decided I would try working with a single image. I found I was able to pull out enough detail, certainly comparable to what I could do with stacking, however, noise was a problem. I tried using the AI-denoise capability recently introduced into Lightroom, and surprisingly, it worked very well, however, it was unable to recover the detail lost due to the noise. This is where the stacking approach shines, as it is able to retain the detail and manage the noise.
Combining the Two
Combining the two photographs, the landscape and the night sky, was done through Photoshop’s “Sky Replacement” feature.
First, I exported my night sky photograph as a jpg file, then I imported it in to the “sky replacement database” associated with the Sky Replacement function.
Following that, I selected the landscape image, activated the Sky Replacement function, selected the newly imported [night] sky. After a few minor shifts of the newly added “sky layer” the merging was complete.
Post-process the combined image
With the combined image, in Lightroom, I made some minor adjustments to the lighting to ensure the image “made sense”. Such changes will be specific to each picture so those I made here are not generally applicable.
Estimating Maximum Shutter Speed
The key challenge with astrophotography is being able to capture enough star light to successfully make a photograph. On a fixed tripod, the amount of time one can keep the shutter open, before those points of light turn into lines, is limited, but it can be calculated. I was using a 23mm-equivalent lens on a medium format body with a 100mp sensor. The typical recommendation is to shoot wide open (e.g., f/2.8) at ISO 1600, however, the reality is this is just a starting point for an iterative process of finding the right combination of shutter speed, ISO and aperture. Using the 500 rule, I estimated I could keep the shutter open for about 21 seconds [9]. The NPF rule was more conservative, estimating about 11 seconds [9]. However, I planned on using stacking software, which meant I could take shorter exposures reducing the trailing effect even further. I ended up taking 30 shots, at 6.5 seconds each. This would be (with stacking software) the equivalent of one shot at 195 seconds4.
The 500 Rule
The 500 rule is a simple formula to estimate maximum shutter speed before star trails appear[1][2][3]:
Maximum shutter speed (seconds) = 500 / (Focal length of lens)
For example, with a 20mm lens:
500 / 20 = 25 seconds
However, many sources note this rule is too lenient and often results in visible star trails with modern high-resolution sensors. They suggest a “400” or even a “300 rule” [2][3].
The NPF Rule
A more advanced formula that takes into account additional factors is the NPF rule[4]:
t = (k * N * f * p) / (δ * cos(φ))
Where:
- t = Recommended shutter speed
- k = Multiplication factor (1-3)
- N = F-number (aperture)
- f = Focal length
- p = Pixel pitch
- δ = Minimum declination
- φ = Latitude
This formula is more complex but provides more accurate results by accounting for factors like pixel size and direction of view.
Source: https://www.photopills.com/calculators/spotstars
Citations:
[1] Long-Exposure Astrophotography
This tutorial provides an end-to-end procedure for astrophotography
[2] 500 Rule vs NPF Rule: Shutter Speed for Astrophotography
This tutorial digs deep into the different rules.
[3] The 500 Rule
This tutorial provides a description of the 500 rule.
[4] Advanced Astrophotography Shutter Time Calculator
This page provides an explanation of the different estimation methods as well as a simple 500-rule calculator.
[5] Astrophotography Settings – Tips and Secrets for Epic Shots
This tutorial provides some basic tips, including camera setup.
[7]What exactly is the 500 rule for exposure times?
[8] Rule of 500: How long before you see star trails in an untracked shot?
[9] The 500 Rule Photography Calculator for Milky Way Exposure
Stacking Astrophotography Images in Photoshop
Step 1: Load Images as Layers
- Open Photoshop and go to File > Scripts > Load Files into Stack.
- Click Browse and select all the astrophotography images you want to stack.
- Do not check “Attempt to Automatically Align Source Images” (this will be done in the next step)
- Click OK[1].
Step 2: Align Layers
- Select all layers in the Layers panel.
- Go to Edit > Auto-Align Layers and choose “Auto” as the alignment option. If this doesn’t work then it is necessary to manually align each photograph in the stack. Before proceeding with a manual effort, undo the auto-alignment. Undo the “auto align” and see [1] details on a manual process.
Step 3: Convert to Smart Object
- With all layers still selected, go to Layer > Smart Objects > Convert to Smart Object[1].
Step 4: Apply Stack Mode
- Go to Layer > Smart Objects > Stack Mode and select “Median” or “Mean”[1].
- Median is generally better for removing random noise while preserving detail.
Tips:
- Use at least 10-15 images for good noise reduction results.
- Keep exposure settings consistent across all images being stacked.
- Consider using specialized astrophotography stacking software like DeepSkyStacker for more advanced projects.
By stacking multiple exposures, you can significantly reduce noise and bring out faint details in your astrophotography images. The more images you stack, the better the signal-to-noise ratio will be in your final result[2].
Citations:
[1] Astrophotography Photo Stacking – A Photoshop tutorial
Starting at 3:17, this video describes the stacking process. It includes a manual procedure for aligning images in case the auto-align does not work.
[2] How to Stack Star Photos to Reduce Noise in Photoshop
This tutorial provides a round trip process from Lightroom, to Photoshop and back.
[3] Image stacks
Adobe’s explanation of stacking and the different blending modes.
Stretching
“Stretching” in astrophotography processing refers to the technique of expanding the histogram of an image to reveal faint details that are initially hidden in the shadows:
- Purpose: Stretching aims to bring out faint nebulosity, galaxies, and other dim celestial objects while preserving detail in brighter areas[2].
- Starting point: Raw astrophotography images are typically very dark (linear) and need stretching to reveal details[5]. A single exposure or stacked image will look much darker than the final processed version[5].
- Methods in Photoshop:
- Curves adjustment: This is one of the primary tools for stretching. You can lift the curve near the dark end to brighten shadows while keeping highlights in check[4].
- Levels adjustment: Moving the middle slider to the left stretches the image[4].
- Specialized tools: Some astrophotographers use plugins or actions like the Arcsinh stretch for more advanced control[6].
- Iterative process: Stretching is often done in multiple small steps rather than one large adjustment[4].
- Balancing act: The goal is to reveal faint details without overexposing bright areas or introducing too much noise[2][5].
- Histogram: Stretching moves the histogram data from being clustered on the left (shadows) towards a more spread-out distribution[5].
- Non-linear adjustment: Effective stretching usually involves non-linear adjustments to compress the wide dynamic range of astrophotography data into a viewable image[6].
- Preserving data: It’s important to work in 16-bit mode and use adjustment layers to preserve image data and allow for non-destructive editing[2].
When stretching astrophotography images in Photoshop, the key is to gradually reveal details while carefully monitoring the effect on both faint and bright areas of the image. It often requires experimentation and practice to achieve the best results for each specific image.
Citations:
[1] Basic Stretching in Photoshop, Astro Pixel Processor and Pixinsight
This video covers stretching in three programs: Photoshop, Astro Pixel and Pixinsight.
[2] Astrophotography Image Processing Tutorial
The part of this tutorial that covers stretching goes into a fair amount of detail, more than the video above and is likely suitable if more explanation or problem solving is required.
[3] Image stretching
This tutorial provides a theoretical explanation for the popular stacking tool Siril.
[4] A Guide to Stacking, Background Extraction and Stretching
This tutorial talks about stretching for three different applications: Siril, Affinity Photo and Photoshop. For photoshop, the author provides a set of presets (download) to facilitate the stretching process in Photoshop.
[5] What Should Your Images Look Like?
The included video provides a useful baseline/overview for beginners. A good place to start.
[6] ASTRO-IMAGING: Stretching The Truth
This tutorial explains the meaning of linear vs. non-linear photographs and the role and meaning of stretching.
[7] When to stop stretching the image?
Answer: this is where the “art” comes in; it’s a matter of taste and balancing noise vs. detail
- The first package I used (ASTAP), was freeware, I had difficulty getting it to work. The Second package (Starry Landscape Stacker) had a cost, about $40 US. The third application was Siril, which is also a freeware application. Unfortunately one of the more popular packages, DeepSkyStacker, is not available on the Apple Platform. ↩︎
- “Stretching” in astrophotography processing refers to the technique of expanding the histogram of an image to reveal faint details that are initially hidden in the shadows. ↩︎
- I tried the auto-alignment feature, and sometimes it worked, but frequently it did not. Following a manual alignment approach is not only a tedious process, but going beyond 6 or 7 images (in my experience) becomes increasingly difficult as shifting images to the left-right, up-down is not longer sufficient and image rotation becomes necessary to properly align additional layers. ↩︎
- While the time is approximately the same, there are other benefits with stacking, including noise reduction, better dynamic range and stacking reduces heating the sensor. ↩︎